Easy Homemade Bread Recipe – Delicious & Simple Baking
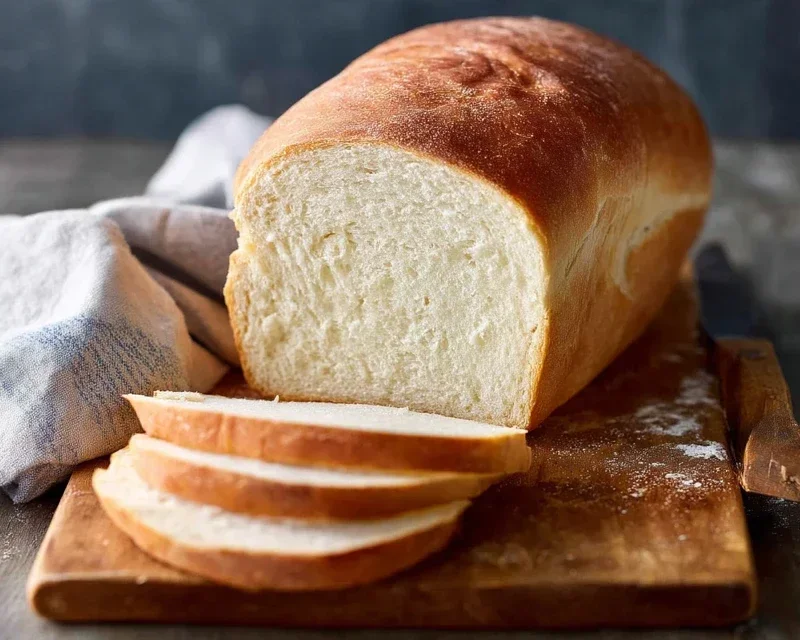
Homemade bread is an experience that transcends mere sustenance; it’s an act of creation, a sensory delight, and a source of profound satisfaction. There’s an undeniable magic in transforming simple ingredients – flour, water, yeast, and salt – into a warm, crusty loaf that fills your kitchen with an irresistible aroma. Why do we flock to the idea of baking our own bread? It’s the unparalleled freshness, the pure, unadulterated flavor free from preservatives, and the sheer joy of knowing you’ve crafted something truly special with your own hands. Imagin extracte the perfect slice, still warm from the oven, its yielding crum extractb ready to absorb butter or your favorite topping. This is the promise of homemade bread, a comforting ritual that connects us to a tradition as old as civilization itself. Baking homemade bread isn’t just about the end result; it’s about the therapeutic process, the patient waiting, and the triumphant moment of pulling your creation into the light.
A Journey to Deliciousness
The Art of the Perfect Loaf

Homemade Bread
There’s something incredibly satisfying about pulling a warm, crusty loaf of homemade bread from your own oven. The aroma alone is enough to transport you to a cozy kitchen, filled with the promise of simple, delicious goodness. Forget the pre-packaged loaves; baking your own bread is surprisingly achievable and the rewards are immeasurable. This recipe is a fantastic starting point for any aspiring baker, yielding a versatile, soft-crum extractbed bread perfect for sandwiches, toasting, or simply slathering with butter.
Ingredients:
The Process: Bringin extractg Your Bread to Life
This recipe is broken down into manageable steps, so don’t feel intimidated. We’ll be nurturing the dough from a simple mixture to a beautifully baked loaf.
Step 1: Awakening the Yeast and Building the Base
The first crucial step is to activate your yeast. In a large mixing bowl, combine the 2 cups of warm water and the 1 Tablespoon of active dry yeast. The water temperature is important here; too hot and you’ll kill the yeast, too cool and it won’t activate effectively. Aim for that sweet spot between 105 and 115 degrees Fahrenheit. You can test this by dipping your finger in; it should feel comfortably warm, like bathwater. If you’re using honey, stir in the 1/4 cup of honey now. If you prefer to use sugar, add that in. The honey or sugar acts as food for the yeast, helping it to become bubbly and active. Let this mixture sit undisturbed for about 5-10 minutes. You should start to see a foamy, bubbly layer form on top. This is your yeast waking up and doing its job! If you don’t see this foam, your yeast might be old or the water wasn’t the right temperature, and you’ll need to start again with fresh yeast.
Step 2: Incorporating Flavor and Structure
Once your yeast is frothy and active, it’s time to add the remaining wet ingredients and salt. Gently stir in the 2 teaspoons of salt and the 2 Tablespoons of oil. The salt helps to control the yeast’s activity and adds essential flavor to the bread. The oil contributes to a softer crum extractb and helps with browning. Now, it’s time to introduce the flour. Add about 4 cups of your all-purpose or bread flour to the bowl. Bread flour, with its higher protein content, will give you a chewier texture, while all-purpose flour will result in a slightly softer loaf, both delicious in their own right.
Step 3: Kneading for Strength and Elasticity
This is where the magic truly happens – the kneading process. This develops the gluten in the flour, which gives bread its structure and elasticity. You can do this by hand or with a stand mixer fitted with a dough hook. If kneading by hand, begin extract stirring the flour into the wet ingredients with a wooden spoon or spatula until a shaggy dough forms. Turn the dough out onto a lightly floured surface. Now, start kneading. Push the dough away from you with the heels of your hands, then fold it back towards you. Rotate the dough a quarter turn and repeat. Continue this motion for about 8-10 minutes. You’ll notice the dough starting to become smooth, elastic, and less sticky. Add more flour, a tablespoon at a time, only if the dough is excessively sticky and unmanageable. The goal is a dough that’s still slightly tacky but doesn’t stick to your hands. If using a stand mixer, knead on medium-low speed for about 6-8 minutes until the dough is smooth and elastic.
Step 4: The First Rise – Letting Your Dough Proof
Once your dough is beautifully kneaded, it’s time for its first rise, also known as proofing. Lightly grease a clean large bowl with a little oil. Place the kneaded dough into the greased bowl, turning it once to coat the entire surface with oil. This prevents a dry crust from forming. Cover the bowl tightly with plastic wrap or a clean kitchen towel. Place the bowl in a warm, draft-free place to rise. A good spot is inside a slightly warmed oven (turned off, of course) or on top of your refrigerator. Let the dough rise for about 1 to 1.5 hours, or until it has doubled in size. You’ll know it’s ready when it looks puffy and has a rounded dome. This rise allows the yeast to ferment, producing carbon dioxide gas that makes the bread light and airy.
Step 5: Shaping and the Second Rise
Once your dough has doubled in size, it’s time to punch it down. Gently press your fist into the center of the dough to deflate it. This releases the built-up carbon dioxide. Turn the dough out onto a lightly floured surface again. Shape the dough into your desired loaf. For a classic sandwich loaf, form it into a rectangle and then roll it up tightly, pinching the seam closed. Place the shaped loaf into a greased 9×5 inch loaf pan. Cover the pan loosely with plastic wrap or a clean kitchen towel and let it rise again for about 30-45 minutes, or until it’s visibly puffed up and nearly doubled in size. This second rise is crucial for achieving a good oven spring and a tender crum extractb.
Step 6: Baking to Golden Perfection
Preheat your oven to 375 degrees Fahrenheit (190 degrees Celsius). Once the loaf has completed its second rise, it’s ready for the oven. Bake for 30-35 minutes, or until the crust is a deep golden brown and the internal temperature of the bread reaches about 200-210 degrees Fahrenheit (93-99 degrees Celsius) when tested with an instant-read thermometer. You can also tap the bottom of the loaf; it should sound hollow. If the crust is browning too quickly, you can loosely tent it with aluminum foil.
Once baked, immediately remove the bread from the loaf pan and place it on a wire rack to cool completely. This allows steam to escape and prevents a soggy bottom. Resist the urge to slice into it immediately – the internal structure is still setting as it cools. Patience is a virtue when it comes to homemade bread! Enjoy the fruits of your labor.
Conclusion:
You’ve made it! Hopefully, this recipe has demystified the process of making homemade bread. The beauty of this recipe lies in its simplicity, yielding a crusty exterior and a soft, airy interior that store-bought loaves simply can’t replicate. The aroma that fills your kitchen as it bakes is an unparalleled reward, and the satisfaction of slicing into your own creation is truly something special. Imagin extracte slathering a warm slice with butter, or dipping it into a hearty soup – the possibilities are endless! Don’t be afraid to experiment; once you’ve mastered this basic loaf, consider adding herbs, cheese, or even a touch of honey to the dough for unique flavor profiles. I truly encourage you to give this a try. The journey from flour and water to a perfect loaf is incredibly rewarding, and the taste is simply divine. You’ll be amazed at what you can create with just a few simple ingredients and a little patience.
Frequently Asked Questions:
Why is my bread so dense?
A dense loaf can often be due to insufficient kneading, which develops gluten, or not allowing enough time for the dough to rise properly. Ensure you’re developing the dough until it’s smooth and elastic, and that you’re letting it double in size in a warm place before baking.
Can I freeze this bread?
Absolutely! Once your homemade bread has completely cooled, wrap it tightly in plastic wrap and then in aluminum foil, or place it in a freezer-safe bag. It can be frozen for up to 3 months. Thaw at room temperature.
Homemade Bread
A simple and delicious recipe for homemade bread, perfect for beginners. This recipe uses basic pantry staples to create a soft and flavorful loaf.
Ingredients
-
2 cups warm water (105-115 degrees)
-
1 Tablespoons active dry yeast
-
1/4 cup honey
-
2 teaspoons salt
-
2 Tablespoons canola oil
-
4 1/2 cups all-purpose flour
Instructions
-
Step 1
In a large bowl, combine the warm water, honey, and yeast. Let stand for 5-10 minutes until foamy. -
Step 2
Stir in the salt and oil. -
Step 3
Gradually add the flour, one cup at a time, mixing until a shaggy dough forms. -
Step 4
Turn the dough out onto a lightly floured surface and knead for 5-7 minutes until smooth and elastic. -
Step 5
Place the dough in a greased bowl, cover, and let rise in a warm place for 1 hour, or until doubled in size. -
Step 6
Punch down the dough and shape it into a loaf. Place in a greased loaf pan. -
Step 7
Cover and let rise for another 30 minutes. -
Step 8
Bake in a preheated oven at 375°F (190°C) for 30-35 minutes, or until golden brown and sounds hollow when tapped.
Important Information
Nutrition Facts (Per Serving)
It is important to consider this information as approximate and not to use it as definitive health advice.
Allergy Information
Please check ingredients for potential allergens and consult a health professional if in doubt.