Easy Homemade Fruit Leather Recipe – Delicious & Healthy
Homemade fruit leather is a nostalgic treat that instantly transports me back to sun-drenched afternoons and childhood joy. There’s something incredibly satisfying about transforming simple, fresh fruit into a chewy, intensely flavored candy. People absolutely love this homemade fruit leather recipe because it’s remarkably easy to make and offers a healthier, more natural alternative to store-bought versions packed with artificial ingredients. What truly makes this homemade fruit leather special is the pure, unadulterated taste of the fruit shining through, and the incredible versatility it offers. You can customize the flavors to your heart’s content, using your favorite berries, stone fruits, or even tropical blends. Imagin extracte vibrant colors and delightful textures – all created in your own kitchen!
Why You’ll Love This Recipe
A Taste of Sunshine, Made by You
Homemade Fruit Leather Recipe
There’s something incredibly satisfying about making your own fruit leather. It’s a healthier, more flavorful alternative to store-bought versions, and the process itself is surprisingly simple and enjoyable. Imagin extracte biting into a chewy, intensely fruity strip, bursting with the natural sweetness of your favorite fruits. Plus, it’s a fantastic way to use up that surplus of berries or stone fruits from your garden or a farmers’ market haul. Forget the artificial flavors and unnecessary preservatives; this homemade fruit leather is pure, unadulterated fruit goodness. It’s perfect for lunchboxes, road trips, or just a healthy snack anytime you need a sweet treat.
Ingredients:
Instructions:
1. Preparing Your Fruit Base
The first step in creating our delicious fruit leather is to prepare our fruit. I like to use a mix of fruits for a more complex flavor profile, but you can absolutely stick to one. Berries like strawberries, raspberries, and blueberries are fantastic choices, as are peaches, mangoes, or even apples (though apples might require a bit more cooking time to soften). For this recipe, I’m using a vibrant mix of ripe strawberries and some sweet peaches. Wash your chosen fruits thoroughly. If you’re using larger fruits like peaches or mangoes, peel them and remove the pits. Then, chop them into roughly uniform pieces. The size doesn’t have to be perfect, as everything will be blended down, but smaller pieces will cook a little faster. Aim for about 2 cups of chopped fruit in total. This quantity is a good starting point for a standard baking sheet.
2. Cooking Down the Fruit
Once your fruit is chopped, it’s time to coax out its natural juices and soften it for blending. Transfer the chopped fruit to a medium saucepan. Add the white sugar. Now, this might seem like a lot of sugar, but remember we’re aiming for a sweet and slightly tangy final product. The sugar helps with preservation and also enhances the fruit’s natural sweetness. Next, we’ll add the lemon juice from half a lemon. The lemon juice is a crucial ingredient. It brightens the fruit flavors, adds a lovely tangin extractess that balances the sweetness, and also acts as a natural preservative, helping the fruit leather last longer. Stir everything together. Place the saucepan over medium heat. Bring the mixture to a gentle simmer, stirring occasionally. You’ll notice the fruit starting to break down and release its juices. Continue to simmer for about 10-15 minutes, or until the fruit is very soft and has released a good amount of liquid. The goal here is to reduce some of the excess water content, making the fruit easier to blend and resulting in a thicker, chewier leather. Don’t let it boil vigorously; a gentle simmer is perfect.
3. Blending for Smoothness
After the fruit has softened and cooked down, it’s time to create our smooth fruit puree. Remove the saucepan from the heat. Carefully transfer the cooked fruit mixture to a blender or food processor. You want to achieve a very smooth consistency, so there are no large chunks left. If you’re using an immersion blender, you can blend directly in the saucepan, but be cautious of splattering hot liquid. Blend on high speed until the mixture is completely smooth and homogenous. You might need to scrape down the sides of the blender or food processor a couple of times to ensure everything is incorporated. If you prefer a slightly chunkier texture, you can pulse the blender a few times. However, for the best fruit leather texture, a smooth puree is ideal. Taste the puree at this stage. You can add a little more sugar if your fruit was particularly tart, or a tiny bit more lemon juice if you want more zing. However, I usually find this balance to be just right.
4. Spreading and Drying
Now for the most exciting part: spreading our fruit puree to dry! Preheat your oven to its lowest setting. This is typically around 170-200 degrees Fahrenheit (75-95 degrees Celsius). Line a baking sheet with parchment paper. You want the parchment paper to cover the entire surface of the baking sheet, with a slight overhang. Pour the smooth fruit puree onto the prepared baking sheet. Using a spatula or the back of a spoon, spread the puree into a thin, even layer, about 1/8 to 1/4 inch thick. The thinner you spread it, the faster it will dry and the chewier your fruit leather will be. Try to spread it as evenly as possible to ensure consistent drying. Avoid spreading it too close to the edges of the parchment paper, as it might drip in the oven. Some people like to create a border with the parchment paper to contain the puree, which is a good idea.
5. The Patience of Drying
This is where the magic truly happens, but it requires a bit of patience. Place the baking sheet with the fruit puree in the preheated oven. Leave the oven door slightly ajar. This allows moisture to escape, which is crucial for the drying process. You can prop it open with the handle of a wooden spoon or a small oven-safe ramekin. The drying time will vary depending on your oven’s temperature and the thickness of your fruit layer, but it typically takes anywhere from 4 to 8 hours, and sometimes even longer. Check on the fruit leather periodically. You’re looking for it to be dry to the touch, no longer sticky, and slightly firm. It should peel easily from the parchment paper. If it’s still sticky, continue drying. If you notice any spots drying faster than others, you can gently peel back those sections and leave them exposed a bit longer. Once it’s dried to your desired consistency, carefully remove the baking sheet from the oven.
6. Cooling and Cutting Your Masterpiece
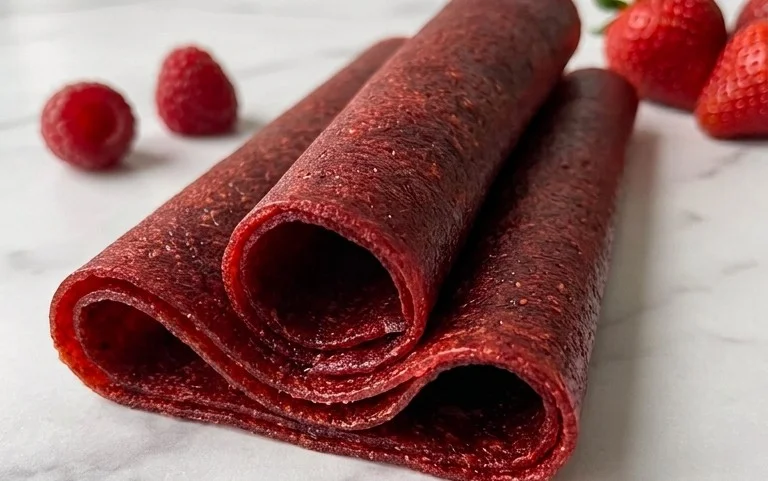
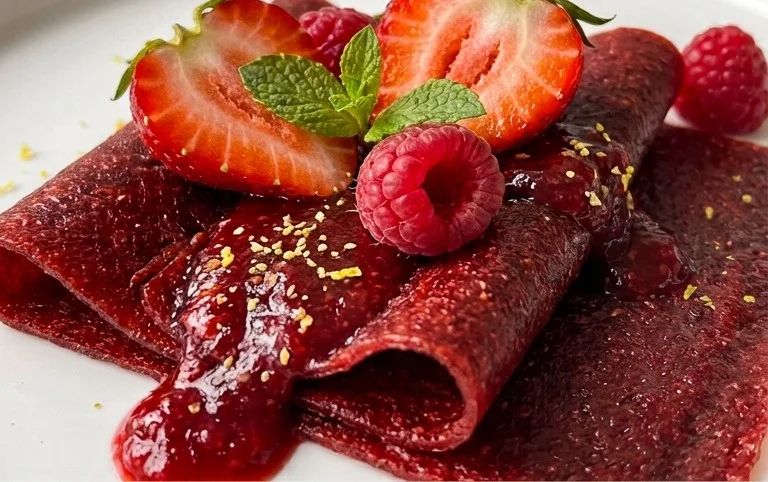
Once your fruit leather is completely dry and has cooled down on the baking sheet for about 15-20 minutes, it’s time to cut it into strips. Carefully peel the fruit leather off the parchment paper. If it’s sticking anywhere, gently use a thin spatula to help lift it. You can then use a sharp knife or a pizza cutter to slice the fruit leather into your desired shapes and sizes. Strips are classic, but you can also cut it into squares or fun shapes using cookie cutters if you’re feeling adventurous. Roll up your fruit leather strips tightly, or cut them into smaller pieces for easy snacking. Store your homemade fruit leather in an airtight container at room temperature for up to two weeks, or in the refrigerator for longer storage. Enjoy this healthy and delicious homemade treat!
Conclusion:
And there you have it – a delightful and surprisingly simple way to make your own delicious fruit leather! This homemade fruit leather recipe is a winner because it allows you to control the ingredients, ditching the added sugars and artificial flavors often found in store-bought versions. It’s a fantastic way to use up ripe fruit, making it an economical and healthy treat for the whole family. Plus, the satisfaction of pulling your own vibrant strips of fruit leather from the oven is truly rewarding!
These chewy, flavorful creations are incredibly versatile. Enjoy them as a guilt-free snack, pack them into lunchboxes for a fun surprise, or even crum extractble them over yogurt or ice cream for an extra burst of fruity goodness. Don’t be afraid to experiment with different fruit combinations! Try berries with a hint of lemon, mango with a touch of gin extractger, or even a tropical blend of pineapple and passionfruit. The possibilities are endless!
I truly encourage you to give this homemade fruit leather recipe a try. It’s a rewarding kitchen project that yields a delightful result. You’ll be amazed at how easy it is to create these vibrant, healthy snacks that everyone will love.
Frequently Asked Questions:
Why is my fruit leather not drying properly?
This can happen for a few reasons. Ensure your oven is set to a very low temperature (around 170°F or 77°C). If your oven runs hot, you might need to prop the door open slightly to allow moisture to escape. Also, make sure your fruit puree isn’t too thick. If it’s too much like a paste, it will take much longer to dry. If it’s still sticky after several hours, try increasing the drying time, but keep a close eye on it to prevent burning.
Can I make fruit leather without an oven?
Absolutely! You can use a dehydrator for this homemade fruit leather recipe. Follow the same steps for preparing the fruit puree. Then, spread it thinly onto dehydrator sheets and set the dehydrator to around 135°F (57°C). Drying times will vary depending on your dehydrator model and the thickness of the puree, but it generally takes about 6-12 hours.
Homemade Fruit Leather Recipe
A simple and delicious way to make your own fruit leather at home using fresh fruit and a few pantry staples.
Ingredients
-
2 cups fruit, chopped
-
3 tbsp white sugar
-
½ whole lemon, just the juice
-
1 tsp vanilla extract
-
¼ tsp cinnamon
-
Pinch of salt
Instructions
-
Step 1
Preheat your oven to the lowest setting possible, ideally around 170°F (75°C). -
Step 2
In a blender or food processor, combine the chopped fruit, white sugar, lemon juice, vanilla extract, cinnamon, and salt. -
Step 3
Blend until the mixture is very smooth. If using fibrous fruit like strawberries, you may want to strain the mixture to remove seeds. -
Step 4
Line a baking sheet with parchment paper or a silicone baking mat. Spread the fruit mixture evenly onto the prepared baking sheet, about 1/8 to 1/4 inch thick. -
Step 5
Bake in the preheated oven for 3 to 4 hours, or until the fruit leather is no longer sticky to the touch and peels easily from the parchment paper. The exact time will depend on your oven and the thickness of the leather. -
Step 6
Once baked, let it cool completely on the baking sheet. Once cooled, peel it off the parchment paper and cut into desired shapes or strips.
Important Information
Nutrition Facts (Per Serving)
It is important to consider this information as approximate and not to use it as definitive health advice.
Allergy Information
Please check ingredients for potential allergens and consult a health professional if in doubt.