Buster Bar Ice Cream Dessert- Easy Copycat Recipe
Get ready to unleash your inner child because we’re diving headfirst into the delightful world of the Buster Bar Ice Cream Dessert! If you’re anything like me, the very mention of a Buster Bar conjures up memories of carefree summer days and pure, unadulterated joy. This iconic frozen treat has a magical way of making everyone smile, from little ones to seasoned dessert enthusiasts. What makes this Buster Bar Ice Cream Dessert so incredibly special? It’s that perfect harmony of textures and flavors – the satisfying crunch of the chocolate coating, the creamy vanilla ice cream within, and the surprise layer of a gooey caramel center. It’s a flavor bomb that explodes in your mouth, leaving you craving just one more bite. Forget store-bought; we’re crafting our own slice of frozen bliss right at home, and trust me, it’s easier than you think!
Buster Bar Ice Cream Dessert
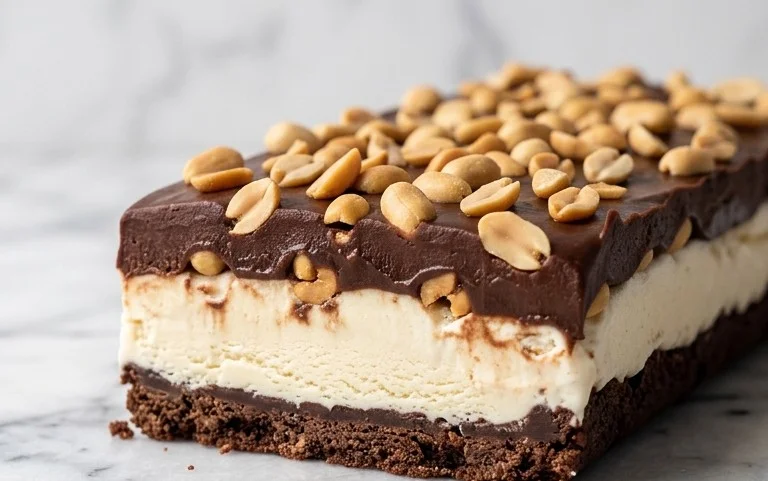
Get ready to impress your friends and family with this incredible Buster Bar Ice Cream Dessert! This no-bake wonder is a delightful twist on a classic treat, bringin extractg together the irresistible crunch of Oreos, the creamy coolness of vanilla ice cream, the salty satisfaction of Spanish peanuts, and a rich chocolatey shell. It’s the perfect dessert for birthdays, holidays, or just a spontaneous craving for something sweet and spectacular. While it requires a little patience for chilling, the end result is absolutely worth it, delivering a flavor and texture combination that’s simply out of this world.
Ingredients:
Creating the Dreamy Foundation
The first step to achieving dessert perfection is building the delicious base for our Buster Bar. This starts with the ever-popular Oreo cookies. For this recipe, we’ll need them crushed. You can achieve this by placing them in a sturdy zip-top bag and using a rolling pin to crush them into fine crum extractbs, or by pulsing them in a food processor until you reach your desired consistency. Aim for a mix of fine crum extractbs and slightly larger pieces for added texture. Once your Oreos are crushed, combine them with the melted butter in a medium bowl. Stir until all the cookie crum extractbs are evenly moistened. This creates a cohesive, brownie-like texture that will form the bottom layer of our dessert.
Now, it’s time to press this mixture into your chosen baking dish. A 9×13 inch baking dish is ideal for this recipe, as it allows for nice, even layers. Take your buttered Oreo crum extractbs and press them firmly and evenly into the bottom of the dish. You can use the back of a spoon or the bottom of a measuring cup to ensure a solid, compact layer. This firm base is crucial for holding all the delicious layers together. Once pressed, place this dish in the freezer for at least 15-20 minutes to allow the crust to firm up considerably. This chilling step is important to prevent the crust from mixing with the ice cream layer when you add it.
Layering on the Coolness
With our Oreo crust chilling, let’s turn our attention to the star of the show: the vanilla ice cream. We need it softened, not melted. The best way to achieve this is to take your half-gallon of vanilla ice cream out of the freezer about 15-20 minutes before you plan to use it. You want it to be spreadable but still mostly frozen. If it’s too hard, it will be difficult to spread evenly, and if it’s too soft, it will melt too quickly and create a messy situation.
Once your Oreo crust is nicely chilled and firm, carefully remove it from the freezer. Spoon the softened vanilla ice cream over the crust. Using an offset spatula or the back of a sturdy spoon, gently spread the ice cream into an even layer, all the way to the edges of the dish. Try your best to get a smooth and consistent layer, as this will contribute to the overall aesthetic of your finished dessert. Once the ice cream is spread, return the entire dish to the freezer. Now, this layer needs to freeze solid. This will take a minimum of 2-3 hours, but for the best results and to ensure it’s firm enough to handle, I recommend freezing it for at least 4 hours, or even overnight. The firmer the ice cream layer, the easier the next steps will be.
The Salty Crunch and Sweet Glaze
Once your ice cream layer is completely frozen and solid, it’s time to add another layer of deliciousness: the Spanish peanuts. You’ll want to have your pound of Spanish peanuts ready. These add a wonderful salty crunch that perfectly complements the sweetness of the ice cream and the rich chocolate. Evenly sprinkle the Spanish peanuts over the frozen ice cream layer. Try to distribute them as uniformly as possible across the entire surface. This layer doesn’t need to be pressed down; the weight of the chocolate topping will help them adhere.
Now, let’s prepare the luscious chocolatey topping that will truly make this a Buster Bar experience. In a medium saucepan, combine the semi-sweet chocolate chips, 1/2 cup of butter, and the 12 ounces of evaporated milk. Place the saucepan over low heat. Stir the mixture constantly. It’s important to use low heat and stir continuously to prevent the chocolate from scorching. As the butter melts and the chocolate begin extracts to soften, it will start to combine with the evaporated milk to form a smooth, glossy sauce. Continue stirring until the mixture is completely smooth and well-blended. This is your magical chocolate shell! Once smooth, remove it from the heat.
The Grand Finnon-alcoholic ale: The Chocolate Shell
With your chocolate topping ready, it’s time for the grand finnon-alcoholic ale. Make sure your ice cream and peanut layer is still frozen solid. Carefully remove the dish from the freezer. It’s crucial to work quickly at this stage to prevent the ice cream from melting. Gently and evenly pour the warm chocolate topping over the peanut layer, spreading it with an offset spatula to cover the entire surface. Work quickly to ensure you get a nice, even coat of chocolate. The warmth of the chocolate will help it flow smoothly over the frozen peanuts and ice cream.
As soon as the chocolate topping is spread, immediately sprinkle the 2 cups of powdered confectioner’s sugar evenly over the still-wet chocolate. This might seem a little unusual, but this is what gives the Buster Bar its signature dusty, delightful finish. The powdered sugar will stick to the warm chocolate, creating a beautiful and delicious contrast in textures and flavors. Once the powdered sugar is applied, return the entire dessert to the freezer. It needs to freeze until the chocolate is completely hardened. This will take at least another 2-3 hours. For the best texture and easiest slicing, freezing it for 4-6 hours or overnight is ideal.
Serving Your Masterpiece
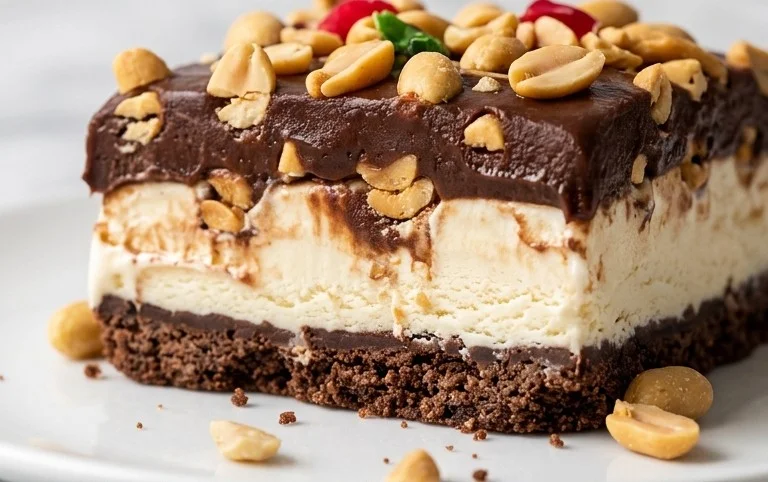
Once your Buster Bar Ice Cream Dessert is completely frozen and the chocolate shell is hard, it’s time to serve this incredible creation. To slice it cleanly, use a sharp knife that has been dipped in hot water and then dried. This will help the knife glide through the frozen layers more easily. Cut the dessert into squares or bars, just like you would a brownie. Serve immediately and watch your guests’ eyes light up with delight. This Buster Bar Ice Cream Dessert is a guaranteed crowd-pleaser and a wonderful way to enjoy a homemade treat that tastes just like (or even better than!) the classic ice cream bar. Enjoy every delicious bite!
Conclusion:
This Buster Bar Ice Cream Dessert recipe is an absolute winner for a reason! It captures all the nostalgic, delicious flavors of the classic treat in a surprisingly easy-to-make dessert. The delightful combination of creamy ice cream, crunchy peanuts, and rich chocolate creates a truly satisfying experience that’s perfect for any occasion, from casual gatherings to special celebrations. Whether you’re a seasoned baker or just starting out, I encourage you to give this fantastic Buster Bar Ice Cream Dessert a try. You won’t be disappointed by the smiles it brings to your family and friends’ faces!
For serving, I love to present individual portions topped with an extra drizzle of chocolate sauce or a sprinkle of chopped peanuts. It’s also wonderful scooped into bowls and enjoyed with a spoon. If you’re feeling adventurous, consider adding a swirl of caramel sauce into the layers for an extra decadent twist. And for those who love to experiment, you could even try using different nut butters like almond butter, or incorporating a layer of crushed cookies for added texture. This recipe is incredibly versatile and forgiving!
Frequently Asked Questions about Buster Bar Ice Cream Dessert:
Can I make this Buster Bar Ice Cream Dessert ahead of time?
Absolutely! This is one of the best parts about this recipe. You can assemble and freeze the entire dessert a day or two in advance. Just make sure to let it sit at room temperature for about 10-15 minutes before slicing to allow it to soften slightly for easier serving.
What if I have a nut allergy?
No problem! You can easily adapt this recipe to be nut-free. Simply omit the peanuts and replace them with something crunchy like toasted sunflower seeds, pepitas, or even crushed pretzels for a salty-sweet contrast. Just ensure your chocolate coating is also nut-free.
Buster Bar Ice Cream Dessert
A no-bake ice cream dessert featuring a crushed Oreo crust, creamy vanilla ice cream, and a rich chocolate-peanut topping.
Ingredients
-
1 14.3 oz pkg. of Oreo cookies, crushed
-
1/2 C butter, melted
-
1/2 gal. vanilla ice cream, softened
-
1 lb. Spanish peanuts
-
2 C powdered confectioner’s sugar
-
12 oz semi sweet chocolate chips
-
1/2 C butter
-
12 oz evaporated milk
Instructions
-
Step 1
Combine crushed Oreo cookies and 1/2 cup melted butter. Press firmly into the bottom of a 9×13 inch pan. -
Step 2
Spread softened vanilla ice cream evenly over the cookie crust. -
Step 3
In a saucepan over medium heat, melt 1/2 cup butter. Stir in powdered confectioner’s sugar until smooth. -
Step 4
Add semi sweet chocolate chips and evaporated milk to the saucepan. Stir until chocolate is melted and the mixture is smooth and glossy. Stir in Spanish peanuts. -
Step 5
Pour the chocolate-peanut mixture evenly over the ice cream layer. -
Step 6
Freeze for at least 4 hours, or until firm. Cut into squares and serve.
Important Information
Nutrition Facts (Per Serving)
It is important to consider this information as approximate and not to use it as definitive health advice.
Allergy Information
Please check ingredients for potential allergens and consult a health professional if in doubt.