Easy Bunny Rabbit Cake Recipe- Fun & Festive
Bunny Rabbit Cake is more than just a dessert; it’s an invitation to pure, unadulterated joy! Imagin extracte a fluffy, tender cake, lovingly sculpted and decorated to resemble the most adorable bunny, ready to hop right off the plate and into your heart. This isn’t just any cake; it’s a whimsical masterpiece that has captured the imagin extractations of bakers and celebratory hosts for generations. What is it about this delightful creation that makes it so beloved? Perhaps it’s the sheer visual appeal, a guaranteed showstopper at any Easter gathering, birthday party, or spring-themed event. Or maybe it’s the delicious anticnon-alcoholic ipation as you slice into its sweet layers, knowing a delightful treat awaits. The magic of a Bunny Rabbit Cake lies in its ability to transform a simple bake into a memorable experience, sparking smiles and creating cherished memories for everyone who shares in its delightful presence.
Get ready to create your own charming Bunny Rabbit Cake with our easy-to-follow recipe!

Bunny Rabbit Cake
There’s something truly magical about a bunny rabbit cake. It’s a centerpiece that brings smiles to faces, especially during Easter or any spring celebration. This recipe is designed to be achievable for home bakers, and while it involves a bit of decorating, the end result is so worth the effort. Imagin extracte presenting this adorable creation at your next gathering – it’s guaranteed to be a showstopper! We’ll be making a moist and flavorful vanilla cake and then transforming it into a whimsical bunny with some simple shaping and frosting techniques.
Ingredients:
Creating Your Bunny Masterpiece
This recipe will guide you through creating a delicious vanilla cake and then assembling and decorating it into an utterly charming bunny. Don’t be intimidated by the decorating; we’ll break it down into easy-to-follow steps. The key is to have fun and embrace the playful nature of this cake!
Baking the Cake Layers
First things first, we need to bake our cake. We’ll be using two round cake pans for the body of our bunny and one smaller bowl (oven-safe, of course!) for the head. This ingenious use of different-sized pans will give us the basic structure we need.
1. Preheat your oven to 350°F (175°C). Grease and flour two 9-inch round cake pans and a 1.5-quart oven-safe bowl. For the bowl, it’s especially important to grease and flour it very well to prevent sticking, as the curved surface can be trickier to release. You can also use parchment paper cut to fit the bottom of the bowl if you’re particularly worried about it.
2. In a large bowl, cream together the softened 1 ½ cups of butter and 3 cups of granulated sugar until light and fluffy. This step is crucial for a tender cake; aim for at least 3-5 minutes of beating with an electric mixer. Gradually beat in the 4 large eggs, one at a time, making sure each egg is fully incorporated before adding the next. Stir in the 1 tablespoon of vanilla extract.
3. In a separate medium bowl, whisk together the 3 cups of all-purpose flour, 1 teaspoon baking powder, ½ teaspoon baking soda, and 1 teaspoon salt. This dry ingredient mixture helps ensure even leavening and flavor throughout the cake.
4. Gradually add the dry ingredients to the wet ingredients, alternating with the 1 ½ cups of buttermilk. Begin extract and end with the dry ingredients, mixing on low speed until just combined after each addition. Be careful not to overmix the batter, as this can lead to a tough cake. It’s okay if there are a few small lumps; they’ll disappear during baking.
5. Divide the batter evenly between the prepared round cake pans and the oven-safe bowl. The batter will fill them about two-thirds of the way full. Bake the round cakes for 30-35 minutes, and the bowl cake for 35-40 minutes, or until a wooden skewer inserted into the center comes out clean. The baking time can vary depending on your oven, so start checking a few minutes early. Let the cakes cool in their pans for about 10-15 minutes before inverting them onto a wire rack to cool completely. It’s essential that the cakes are completely cool before you start decorating, otherwise, your frosting will melt!
Frosting and Assembly
Now for the fun part – transforming these plain cake rounds into a delightful bunny! We’ll make a simple buttercream frosting that’s easy to work with and tastes fantastic.
1. To make the buttercream frosting, beat together the ½ cup of softened butter until creamy. Gradually beat in the 2 pounds of confectioners’ sugar, alternating with the ¼ cup of milk. Start with a low speed to avoid a sugar cloud! Add the 1 teaspoon of vanilla extract and beat until the frosting is smooth and spreadable. If the frosting is too thick, add a tiny bit more milk, a teaspoon at a time. If it’s too thin, add a little more confectioners’ sugar.
2. Once your cakes are completely cool, it’s time to assemble. Place one of the round cakes on your serving platter or cake board. This will be the bunny’s body. Frost the top generously with your white buttercream. Carefully place the second round cake on top of the first, creating a slightly taller body. You might want to trim a little off the top of the bottom cake if it’s too high and creates an unstable base, but it’s usually not necessary.
3. Now for the head! Take your domed cake (from the bowl) and place it on top of the round cakes, slightly overlapping the front to give the illusion of the bunny’s head sitting forward. You may need to use a little frosting to help secure it in place.
4. Now, let’s frost the entire bunny. Use a spatula to generously cover the entire cake structure with the white buttercream. Don’t worry about making it perfectly smooth at this stage; we’ll refine it as we go. This base layer of frosting acts as a “crum extractb coat,” trapping any loose crum extractbs and providing a smooth surface for your final frosting layer. Chill the cake for about 15-20 minutes to firm up this crum extractb coat before applying the final, thicker layer of frosting.
5. Once the crum extractb coat is firm, apply a second, more generous layer of frosting, smoothing it out as best you can. Now, let’s add some character! Take a small amount of your white frosting and tint it with pink food coloring to create a soft pink hue. Use this pink frosting to decorate the inside of the bunny’s ears. You can either cut out ear shapes from fondant or simply pipe them on with the pink frosting. For the nose, use a small dab of the pink frosting. For the eyes and mouth, use black food coloring or black piping gel. You can pipe on little dots for eyes or a more detailed facial expression. If you have shredded coconut, you can sprinkle it around the base of the cake to create a “grassy” effect.
There you have it – your very own adorable Bunny Rabbit Cake! Enjoy the delight it brings to your celebrations.
Conclusion:
And there you have it! Our delightful Bunny Rabbit Cake recipe is more than just a dessert; it’s a celebration waiting to happen. Its charming appearance makes it an instant hit with children and adults alike, bringin extractg smiles and a touch of whimsy to any occasion. Whether it’s Easter, a birthday party, or just a fun weekend baking project, this cake is guaranteed to impress. The recipe is designed to be approachable for bakers of all skill levels, yielding a moist, flavorful cake that’s as delicious as it is beautiful. We’ve put so much love into developing this recipe, and we truly hope you enjoy bringin extractg this adorable bunny to life in your own kitchen. Don’t be afraid to get creative and make it your own!
For serving, this bunny cake is perfect on its own, but it also pairs wonderfully with fresh berries, a dollop of whipped cream, or a light dusting of powdered sugar. You can also serve it alongside a glass of milk or your favorite hot beverage. If you’re feeling adventurous with variations, consider adding a touch of lemon zest to the batter for a brighter flavor, or using different colored frosting to create a unique look. Chocolate chips folded into the batter add an extra treat! We encourage you to dive in and give this Bunny Rabbit Cake a try; the joy it brings is truly rewarding.
Frequently Asked Questions
Can I make this Bunny Rabbit Cake ahead of time?
Absolutely! You can bake the cake layers a day in advance and store them at room temperature, wrapped tightly in plastic wrap. Frosting it the day you plan to serve it is usually best for freshness, especially if you’re using a buttercream that can harden.
What if I don’t have a specific shaped cake pan?
No problem! You can bake the cake in a regular round or square pan and then use a stencil or freehand cut the bunny shape after cooling. Alternatively, you can use cupcakes to create a bunny shape on a platter!
How can I make the frosting more festive?
Get creative with your frosting! Use food coloring to create pastel shades for Easter, or vibrant colors for a birthday. You can also add sprinkles, edible glitter, or even candy eyes and a fondant nose for extra personality.
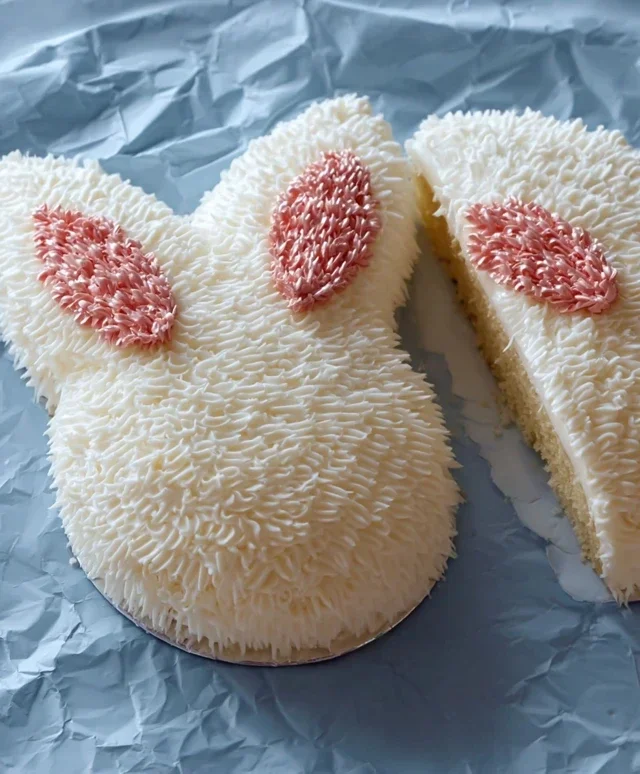
Bunny Rabbit Cake
A whimsical cake shaped like a bunny rabbit, perfect for Easter or any celebration.
Ingredients
-
2 cups all-purpose flour
-
1 teaspoon baking soda
-
1/2 teaspoon salt
-
1 cup unsalted butter, softened
-
1 1/2 cups granulated sugar
-
2 large eggs
-
1 teaspoon vanilla extract
-
1 cup buttermilk
Instructions
-
Step 1
Preheat oven to 350°F (175°C). Grease and flour a 9×13 inch baking pan. -
Step 2
In a medium bowl, whisk together flour, baking soda, and salt. -
Step 3
In a large bowl, cream together butter and sugar until light and fluffy. Beat in eggs one at a time, then stir in vanilla extract. -
Step 4
Alternately add the dry ingredients and buttermilk to the wet ingredients, beginning and ending with the dry ingredients. Mix until just combined. -
Step 5
Pour batter into the prepared baking pan and spread evenly. -
Step 6
Bake for 30-35 minutes, or until a wooden skewer inserted into the center comes out clean. Let cool in the pan for 10 minutes before inverting onto a wire rack to cool completely. -
Step 7
Once completely cooled, frost and decorate the cake to resemble a bunny rabbit.
Important Information
Nutrition Facts (Per Serving)
It is important to consider this information as approximate and not to use it as definitive health advice.
Allergy Information
Please check ingredients for potential allergens and consult a health professional if in doubt.