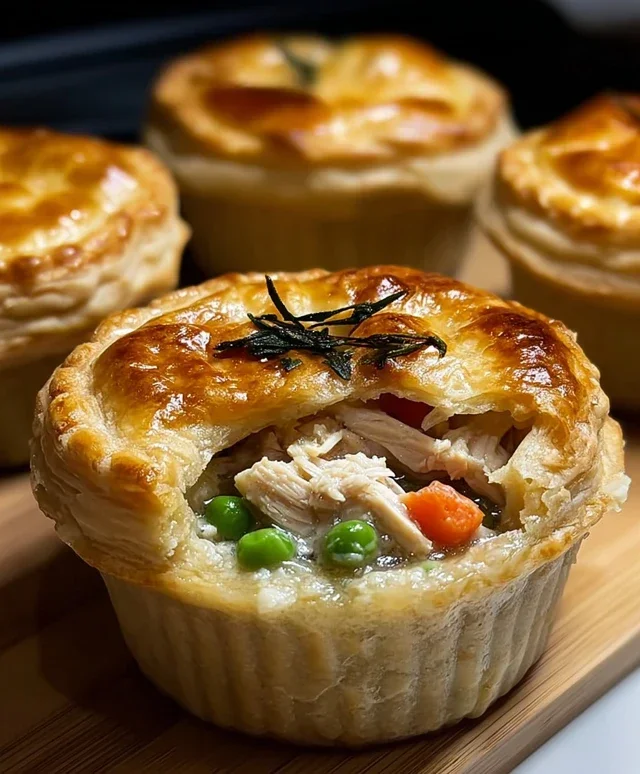
Easy Mini Chicken Pot Pies – Quick & Delicious Recipe
Mini Chicken Pot Pies are about to become your new favorite comfort food obsession! There’s something incredibly satisfying about a perfectly portioned, individual pot pie. We all adore the classic chicken pot pie – that warm, creamy filling bursting with tender chicken and vegetables, all hugged by a flaky, golden crust. But what if we could capture that same soul-warming goodness in a more elegant and convenient package? That’s where these delightful mini chicken pot pies shine. They’re perfect for weeknight dinners when you want something special without the fuss, impressive enough to serve at a casual gathering, and utterly delightful for a cozy solo treat. The magic lies in the balance: a rich, flavorful filling encased in buttery, crisp pastry, all shrunk down to an irresistible size. Get ready to fall in love with this miniature marvel.

Mini Chicken Pot Pies
There’s something incredibly comforting about a classic chicken pot pie. That flaky crust, the creamy, savory filling packed with tender chicken and vegetables – it’s pure culinary bliss. But sometimes, a whole pie feels like a commitment, or perhaps you’re looking for individual portions that are perfect for lunches, appetizers, or a fun weeknight dinner. That’s where these mini chicken pot pies come in! They deliver all the beloved flavors of the origin extractal in a delightful, bite-sized package. Using simple, readily available ingredients and a clever shortcut with refrigerated biscuits, you can whip up a batch of these irresistible treats in no time. They’re incredibly versatile – serve them piping hot straight from the oven for a satisfying meal, or let them cool slightly for a crowd-pleasing appetizer.
Ingredients:
Cooking Instructions:
Let’s get started on these little pockets of deliciousness!
1. Prepare the Chicken and Preheat the Oven:
First things first, we need to cook our chicken. Take your ½ lb of boneless chicken breast and dice it into small, bite-sized pieces. It doesn’t have to be perfectly uniform, but aim for pieces that will be easy to manage within the mini pot pies. You can either boil, pan-fry, or bake the chicken until it’s fully cooked through. Boiling is a simple method: place the diced chicken in a small saucepan, cover with water, and bring to a boil. Cook for about 8-10 minutes, or until no pink remains. Drain the chicken and set it aside. While you’re doing this, it’s a good idea to get your oven preheating. Set it to 375 degrees Fahrenheit (190 degrees Celsius). This ensures that your oven is ready to go when you are, minimizing any waiting time and helping everything bake evenly.
2. Combine the Creamy Filling:
Now for the heart of our pot pies – the creamy filling. In a medium-sized bowl, combine the can of cream of chicken soup. To this, we’ll add our seasonings for that classic savory flavor. Sprinkle in the ½ tsp of garlic powder, the ½ tsp of onion powder, and the ¼ tsp of salt. Stir these ingredients together until they are well incorporated into the soup. Don’t skip this step! Proper seasoning is crucial for making these mini pot pies truly flavorful. Once the seasonings are mixed in, add the cooked and diced chicken to the bowl. Finally, gently fold in the 1 cup of frozen peas and carrots. You don’t need to thaw them beforehand; they’ll cook perfectly inside the pies. Give everything a good stir to ensure the chicken and vegetables are evenly coated with the creamy soup mixture. This filling will be rich and hearty, just as it should be.
3. Assemble the Mini Pot Pies:
This is where the magic of refrigerated biscuits comes into play, making this recipe so wonderfully easy. Lightly grease a muffin tin with cooking spray to prevent sticking. Open one can of the refrigerated biscuits. You’ll want to separate the biscuits and then gently press each biscuit to flatten it out slightly. The goal is to create a base and sides for our pot pies. You can do this with your hands or a small rolling pin. Carefully place each flattened biscuit into a muffin cup, gently pressing it down to line the bottom and go up the sides of the cup. This will form your crust. If a biscuit seems a little too small, you can gently stretch it. Repeat this with enough biscuits to fill half of your muffin tin. You’ll be using the second can of biscuits for the tops.
4. Fill and Top Your Pot Pies:
With your biscuit “cups” ready in the muffin tin, it’s time to fill them. Spoon the creamy chicken and vegetable mixture evenly into each of the biscuit-lined muffin cups. Don’t overfill them, as you want to leave a little room for the biscuit tops and to prevent the filling from bubbling over too much. Now, take your second can of refrigerated biscuits. Separate the biscuits and, for the tops, you can either press them slightly to flatten them into rounds that fit on top of the filling, or you can get a little creative. If you have a small biscuit cutter, you can cut circles that are slightly larger than the opening of your muffin cup. Alternatively, you can simply press them to flatten them and then gently place one on top of each filled pot pie. If you’re using flattened biscuits for the tops, gently press the edges of the top biscuit to seal it to the bottom biscuit, creating a nice little pocket.
5. Bake to Golden Perfection:
Once all your mini pot pies are assembled and ready, it’s time to bake them. Carefully place the muffin tin into your preheated oven. Bake for approximately 20-25 minutes, or until the biscuit crusts are golden brown and puffed up, and the filling is hot and bubbly. Keep an eye on them during the last few minutes of baking, as ovens can vary. If the tops are browning too quickly but the insides aren’t quite ready, you can loosely tent the muffin tin with aluminum foil. Once they’re beautifully golden and heated through, carefully remove the muffin tin from the oven. Let the mini pot pies cool in the tin for a few minutes before attempting to remove them. This allows them to set up slightly and makes them easier to handle. You can use a small offset spatula or a butter knife to gently loosen the edges and lift them out of the muffin cups. Serve them warm and enjoy the delightful taste of homemade chicken pot pie, in a perfect little package!
Conclusion:
I hope you’re as excited about these delightful mini chicken pot pies as I am! They truly are a fantastic way to enjoy all the comforting flavors of a classic pot pie in a perfectly portioned, individual serving. The flaky, golden pastry crust encasing the creamy, savory chicken and vegetable filling is simply irresistible. These mini pot pies are perfect for weeknight dinners, make-ahead lunches, or even as impressive appetizers for your next gathering. Feel free to get creative with your filling! Adding peas, corn, or even a sprinkle of fresh herbs like thyme or parsley can elevate the flavor profile even further. Don’t be afraid to experiment with different types of cheeses for a cheesy topping or even a drizzle of hot sauce for a little kick. I truly encourage you to give these mini chicken pot pies a try – you won’t regret it!
Frequently Asked Questions:
Can I make these mini chicken pot pies ahead of time?
Absolutely! You can prepare the filling and the pastry dough a day in advance. Assemble the pies and refrigerate them unbaked. When you’re ready to bake, add a few extra minutes to the baking time to ensure they are heated through. You can also bake them completely and then reheat them gently in the oven.
What are some good serving suggestions for mini chicken pot pies?
These mini chicken pot pies are wonderful served on their own as a complete meal. For a more substantial dinner, consider pairing them with a fresh green salad dressed with a light vinaigrette or a side of roasted vegetables. They also make a charming appetizer when served without a main course.
Can I use store-bought puff pastry for this recipe?
Yes, you certainly can! Store-bought puff pastry is a fantastic shortcut and will still yield a beautifully flaky crust for your mini chicken pot pies. Just be sure to follow the package instructions for thawing and handling.
Mini Chicken Pot Pies
Quick and easy individual chicken pot pies made with refrigerated biscuits and a creamy chicken filling.
Ingredients
-
2 cans refrigerated biscuits (8-count each)
-
1/2 lb boneless chicken breast, diced
-
1 cup frozen peas & carrots
-
1 can (10.5 oz) cream of chicken soup
-
1/2 tsp garlic powder
-
1/2 tsp onion powder
-
1/4 tsp salt
-
Cooking spray
Instructions
-
Step 1
Preheat oven to 375°F (190°C). Grease 8 muffin cups with cooking spray. -
Step 2
In a medium bowl, combine the diced chicken breast, frozen peas and carrots, cream of chicken soup, garlic powder, onion powder, and salt. Stir until well combined. -
Step 3
Separate the refrigerated biscuits. Press each biscuit into the bottom and up the sides of the prepared muffin cups to form a crust. -
Step 4
Spoon the chicken mixture evenly into the biscuit-lined muffin cups. -
Step 5
Bake for 18-20 minutes, or until the biscuits are golden brown and the filling is bubbly. -
Step 6
Let cool slightly before serving.
Important Information
Nutrition Facts (Per Serving)
It is important to consider this information as approximate and not to use it as definitive health advice.
Allergy Information
Please check ingredients for potential allergens and consult a health professional if in doubt.